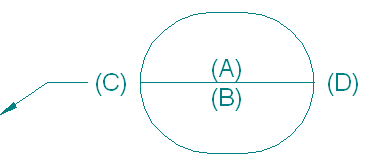
You can create a balloon on a drawing that points to a part and displays the document number, material, or other property in it. In addition to the standard balloon text location (A), you can add property text to the lower half of a split balloon (B), as a prefix (C), and as a suffix (D).

Choose PMI tab→Annotation group→Balloon command  .
.
On the Balloon command bar, click Shape.
From the Balloon Shape list, select the shape you want to use.
Tip:
If you select Oblong or Rectangle
  , the balloon will stretch to fit the text.
On the Balloon command bar, click in the box corresponding to the text location where you want the property text to be displayed.
To display text at (A), click in the Upper box.
Tip:
If the Upper box is unavailable, clear the Item Number option on the command bar.
To display text at (B), click in the Lower box.
To display text at (C), click in the Prefix box.
To display text at (D), click in the Suffix box.
On the Balloon command bar, click Property Text  .
.
In the Select Property Text dialog box, choose the source of the property text.
From the Properties list, select the property you want to use, and then click the Select button.
The correct syntax for the selected property appears in the Property Text box at the bottom of the dialog box.
Example:
If you want to show the part document number in the balloon, click From Graphic Connection to Part in Step 6., and select Document Number from the Properties list in Step 7.
In this example, the property text string is %{Document Number|GP}.
Click OK to save your selection and close the Select Property Text dialog box.
The property text is displayed in the box you clicked on the command bar.
To add property text to another text location in the balloon, repeat Step 4. through Step 8.
In the drawing view, click the part edge where you want to attach the balloon, and then click in free space where you want to place the balloon.
Tip:
When placing a ballooned parts list, you can choose the balloon shape and specify the balloon property text on the Balloon page (Parts List Properties dialog box).
Instead of the technique explained above, you also can copy and paste the property text strings into the Upper, Lower, Prefix, and Suffix boxes on the command bar. Also, if you know the correct property text syntax for the properties you want to extract, you can type it directly in the boxes on the command bar.
To learn more about selecting property text to use in balloons and other annotations, see Create Property Text.