Drawing composition begins with choosing a drawing sheet. Drawing sheets are similar to pages in a notebook. You can place drawing views on different drawing sheets in the document. For example, you can place a front view and a right view on one drawing sheet and a section view on another drawing sheet. Both sheets are saved in the same document. To set up a drawing sheet, use the Sheet Setup command on the Application menu.
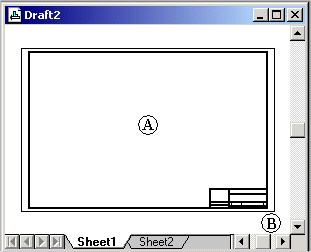
All 3D model drawing views, dimensions, and annotations are placed on the active working sheet, which has two components.
The sheet outline (A) shows the orientation and print region of the sheet. You can change the size and orientation of the sheet outline with the Sheet Setup command.
The area outside of the outline (B) is also part of the drawing sheet.
You also can draw, dimension, and annotate geometry on the 2D Model sheet, and then create 2D model views of the 2D design and place them on the active working sheet.
Use the following links to learn more about drawing sheets:
The sheet where you place part views of the model and do all of your drawing view construction is called a working sheet. You can create as many working sheets as you need. Each working sheet has a background sheet attached to it.
Use the View tab→Sheet Views→Working command to show and hide all working sheets.
You can modify the characteristics of a drawing sheet, such as sheet size and which background sheet is attached, using the Sheet Setup command on the Application menu. You can use the Save Defaults button in the Sheet Setup dialog box to save your settings as the default for all new working sheets created in the document.
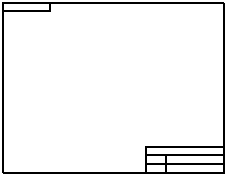
A background sheet is used as a backdrop to the working sheet. You can attach the same background sheet to any number of working sheets, making them useful for any geometry that you want to place on more than one drawing.
Use the View tab→Sheet Views group→Background command to show all background sheets.
Use the Background tab in the Sheet Setup dialog box to apply a background sheet.
When you attach a background sheet to a working sheet with the Sheet Setup command, geometry on the background sheet is displayed and printed along with the working sheet. So that the paper sizes and graphics on both sheets line up, the size of the working sheet is automatically set to the size of the background sheet you attach. A typical customized scheme would be to have a different background sheet for each standard-sized drawing (such as A, B, C, D, or A0, A1, A2, A3, A4).
Note:
The graphics on the background sheet are not affected by drawing sheet scale. They are always displayed 1:1 with respect to the working sheet.
For example, on the background sheet you can add a company-standard border and title block, insert a raster image of your company logo with the Insert Object command, or draw other geometry that you want to show in the background.
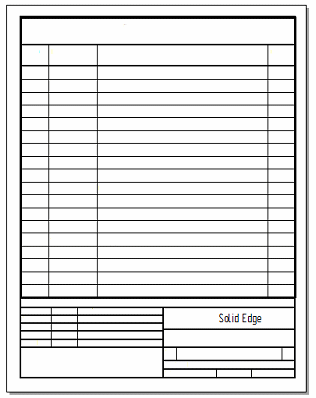
Table sheets are working sheets that are inserted automatically in the sheet tab tray to contain multi-page parts lists and tables. Table sheet tab names show the table group number and the table sheet number within the group, for example, Table1:1. When multiple sheets are inserted for the same table, the second sheet tab name is Table1:2.
Table sheets can be used to organize long parts lists and tables into booklets for easier printing. You can specify that table sheets are created for a new table or parts list when you select the Create new sheets for table option on the Location tab in the Properties dialog box.
You can use the Show sheet backgrounds option on the Location tab to control what is displayed on the table sheets when they are generated. They can be blank sheets, or you can display a table sheet template with a defined border and title block.
Example:
To create a table sheet template, you can:
| Step 1. |
Design a parts list title block that is sized for A Tall (8.5 x 11 inch) paper. |
| Step 2. |
Place it on a working sheet, and then use the Background tab in the Sheet Setup dialog box to associate a background sheet with the template. |
| Step 3. |
Create a template that includes the background sheet and save it to the C:\Program Files\Solid Edge ST5\Template\More folder. |
To learn how to use table sheets when creating parts lists and tables, see Create new sheets for tables.
You can use options on the View tab, Solid Edge Options dialog box (Draft) to specify how the table sheets are named and arranged in the sheet tab tray. For example, you can use the Number sheet groups separately option to keep table sheets together in sheet tab tray.
To learn more, see Sheet names and numbers, below.
The 2D Model sheet is a special sheet used exclusively for working in 2D model space. It enables you to draw on the sheet and annotate at a scale appropriate for the overall size of the part you are designing, yet it prints your drawing with annotations appropriately scaled to the output sheet size you specify.
For example, you can drag a file containing 2D geometry—such as a Solid Edge .dft document or an AutoCAD .dwg or .dxf file—onto the 2D Model sheet. You can add annotations and dimensions using one drawing scale, then use the 2D Model command in the Drawing Views group to create 2D views of your design that you place on one or more working sheets at a different scale for printing.
Unlike working sheets, there is just one 2D Model sheet allowed per document. It is always the first sheet in the document, and it cannot be renamed.
Select the View tab→Sheet Views group→2D Model command to make this sheet available.
The scale of the 2D Model sheet is 1:1. To annotate and dimension at a different scale than the scale of the printed drawing, without having to change the text height before printing, use the Drawing Area Setup command on the Application menu. This command automatically calculates the size and scale of your work area on the 2D Model sheet based on the printout sheet size and the width and height of your intended design.
You can add a drawing border sheet to the 2D Model sheet. Use the Drawing Area Setup command, and select one of the drawing border block files listed on the Drawing Area dialog box in the Place Block list. Using the Drawing Area Setup command ensures that the border is placed at the correct scale for the paper it will be printed on.
If you are not concerned with scaling the border, you can drag a file containing a drawing border onto the model sheet and click to place it.
You can use the sheet tabs located at the bottom of the drawing window in the following ways:
You can select and display a drawing sheet by clicking a tab. The name of the displayed drawing sheet appears in bold.
You can set up sheet options by double-clicking the sheet tab.
You can right-click a drawing sheet tab to access the drawing sheet tab shortcut menu. From this menu, you can insert, delete, reorder, and rename drawing sheets.
You can use the following scroll buttons to scroll through the drawing sheet tabs.
|
|
Scrolls to the first drawing sheet tab in the document. |
|
|
Scrolls to the last drawing sheet tab in the document. |
|
|
Scrolls to the previous drawing sheet tab in the document. To scroll through several tabs at a time, hold Shift, then click this button. |
|
|
Scrolls to the next drawing sheet tab in the document. To scroll through several tabs at a time, hold Shift, then click this button. |
Sheet groups collect similar types of sheets–such as working sheets, background sheets, and table sheets—into groups in the sheet tab tray. Sheet tab groups are displayed in alternating color groups in the sheet tab tray. This makes it easy to find individual sheets and to print related sheets. For example, parts lists that span multiple drawing sheets are grouped in the drawing sheet tab tray to facilitate printing as a booklet.
You can change the default colors assigned to the sheet tabs using the following options on the Colors tab (Solid Edge Options dialog box):
Sheet tab 1—Specifies the sheet tab color of the 2D Model tab, the background sheet tabs, and of alternating groups of working sheet tabs.
Sheet tab 2—Specifies the sheet tab color of the primary working sheet tabs, and for alternating groups of working sheet tabs.
Each sheet group has its own naming convention. Although you cannot specify how names are assigned initially, you can rename individual sheets using the Rename Sheet command on the sheet tab shortcut menu. Two sheets can have the same name if they are located in different groups.
You can use the following options on the View tab, Solid Edge Options dialog box (Draft) to specify how the sheets are named and arranged in the sheet tab tray.
Number sheet groups separately—Keeps sheets of the same type grouped together in the sheet tab tray. Working sheets, background sheets, and table sheets are grouped and numbered independently of one another. Numbers are assigned consecutively and automatically.
Example:
If there is one working sheet and four table sheets, then they are numbered 1, followed by 1, 2, 3, 4.
This option also specifies that table sheets generated for one table are numbered separately from the table sheets generated for a different table.
Example:
When table sheets are produced for different tables, such as two different parts lists, then the table sheets for each parts list are collected into individual groups. The naming convention for the first table sheet group is Table 1:1, Table 1:2, ...; the naming convention for the second table sheet group is Table 2:1, Table 2:2, and so on.
Display sheet number and name in tabs—Displays the working sheet number in front of the sheet tab name.
Example:
Working sheet numbers and names
1 - Sheet1
2 - Sheet2
Background sheet numbers and names
1 - A4-Sheet
2 - A3-Sheet
Table sheet numbers and names
1–Table1:1
2–Table1:2.
Display sheet number in tabs—Displays only the sheet number. Use this option to reduce the width of all tabs, making it easier to find a sheet.
Example:
The following options are selected:
Display sheet number in tabs
Sheet tab 1 color (Light Aqua)
Sheet tab 2 color (Light Orange)

You can create property text that references the sheet tab name or number and display it in a callout. The help topic, Property Text source list (Source: From Active Document), describes the property text that you can reference in the document.
You can reuse your customized background sheets by saving them in a document template. When you use the template to create a new document, all of the background sheets in the template are copied into the new document.
When you want to make your Draft documents available for review in Solid Edge Viewer and View and Markup, you must specify the sheets to be included in the file. Use the following check boxes on the General page (Solid Edge Options dialog box, Draft environment), to select the sheet types:
Include Draft Viewer data in file
Include Working Sheets
Include 2D Model Sheet
Include Background Sheets


