Choose the Hole Table command  from the Home tab→Tables group or the Tables tab.
On the Hole Table command bar, click the Hole Table Properties button and use the Hole Table Properties dialog box to set the options you want.
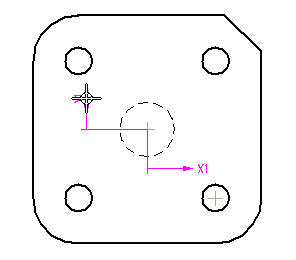
(Optional) Define an origin for the hole table by doing all of the following.
Click an element to define the X origin, and then click where you want to place the X-origin annotation.
Click an element to define the Y origin, and then click to place the Y-origin annotation.
Example:
Tip:
You can also use any keypoints, such as arc center or line endpoint, as origin input.
Select the holes to reference:
On the Hole Table command bar, ensure that the Select Hole Step button is active  .
.
Click the individual holes you want to add to the hole select set, or drag a fence around the holes you want to add.
On the Hole Table command bar, click the Finish button.
Tip:
You can locate arcs as well as holes to include in the hole table.
You can edit the hole table after you place it. Select the hole table, then click the Properties button on the shortcut menu.
You can position the hole table annotation before you place it using the Default Position box on the General tab of the Hole Table Properties dialog box.
You can rename the column headings in your hole table. Using the Hole Table Properties dialog box, on the Columns tab, select the column heading you want to rename in the Columns Used list. Then type the new name in the Title Text box.
You can use the Smart Depth tab on the Hole Table Properties dialog box to intelligently describe hole and thread depth for entries in your hole table.
You can use the renumbering options on the List tab of the Hole Table Properties dialog box to determine how a hole table renumbers when you update it.