Activate the advanced rendering environment in your assembly document. To do this:
Choose Tools tab→Environs group→ERA.
From the Home tab→Render group, choose a render command: Scene or Render Area.
On the Session Entities page in PathFinder, expand the Lighting Studio branch, right-click a light source, and click Edit Definition to display the Light Editor dialog box.
On the Settings page of the Light Editor dialog box, use the controls to modify the parameters governing the quality of the light.
On the Placement page of the Light Editor dialog box, use the following controls to modify the location, orientation, and cone angle of the light, depending on the type of light shader:
Move Light: Click this option to edit the controls for the location, orientation, and cone angle of the light, depending on the type of light shader.
Area Zoom, Zoom, Fit, and Pan controls let you dynamically resize and reposition geometry within the light editor.
Front, Top, and Right controls let you reorient the display to one of the standard views.
Tip:
If you do not see the light source and model displayed in the left pane of the Placement tab, click once in this pane to display it.
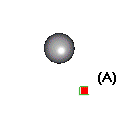
Point: A single point (A) represents the location of the light source. Click Move Light and drag this point to a new location.
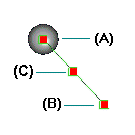
Linear (Distant, Goniometric, and Projector shader types): Click Move Light and move the To Point (A) to the location you want to illuminate, move the From Point (B) to change the direction of the light, and move the Center Point (C) to translate the light vector to a new location.
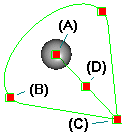
Spot: Click Move Light and move the To Point (A) to the location you want to illuminate, move either of the cone edge points (B) to change the angle of the light cone, move the From Point (C) to change the direction of the light, and move the Center Point (D) to translate the light vector to a new location.