A document's properties are an important part of managing documents. Using document properties, you can store document information with the document itself, instead of in a separate database. This makes it easy to find documents and information about them. Using the File Properties command available from Application menu→Properties, you can view, edit, and store properties for a document.
Propseed.txt is an ASCII text file that is used to populate values on the Properties dialog box. You can use a text editor, such as Notepad, to add values to the file.
By default, the file is located in the Solid Edge Preferences folder. For example, if you loaded Solid Edge to drive C, the path would be C:\Program Files\Solid Edge ST6\Preferences\propseed.txt.
You can instruct Solid Edge to look for propseed.txt in a different folder, including a folder on another machine in the network. To do this, on the Application menu, click Solid Edge Options. On the File Locations tab of the Solid Edge Options dialog box, select Property Seed File and click Modify. On the Browse dialog box, specify the drive and folder containing the propseed.txt file. After specifying the location, click Update.
Some properties are updated automatically by the software; they can include the title, the author, and keywords that identify important information. These properties also can include document statistics, such as document size and the date that a document was created and last modified.
The unit of measure settings for a document are stored as a property. When you set the units of measure on the Units tab on the File Properties dialog box, the units of measure for various types of measurements in a document are displayed in the units you specified. For example, when you set the length unit of measure to inches, then the output values for the measurement commands on the Inspect menu that measure elements lengths are displayed in inches.
You can set units of measure for values such as length, area, or angles. You can change the unit of measure at any time in a document.
The precision readout options set the number of significant figures to display. It sets the accuracy of the unit readout value. The precision setting does not alter the numbers that you type, only the display of the numbers in the box. Values ending in 5 are rounded up. For example, if the precision readout is .123 and you draw a line that is 2.1056 inches long, then the line value length is rounded. The length value appears as 2.106 inches long. If you are using mm as your drawing sheet units, you can have the values display as 3.5 mm or 3.50 mm.
Note:
The units of measure settings for a document do not affect the units used for dimensions you place with the dimensioning commands.
You specify the dimensional value units you want with the Style option on the Dimension command bar. You can modify the delivered dimension styles and create new dimension styles using the Style command on the Format menu. To make it easy to reuse the unit settings you want, you should define and use document templates. You can also set the units used for an individual dimension using the Properties command on the shortcut menu when you select a dimension.
You can track or change the status of a document (for example, Available, In Work, Released, Baselined) in the Status page of the File Properties dialog box.
Note:
The Status page is not available in Insight XT which uses custom properties to display status information.
You can determine the status of a document within its life cycle or browse parts of the document tree. A document tree consists of a top-level document and subdocuments. The status of a document can be updated using the Update Status Info command, available from the shortcut menu in PathFinder while no item is highlighted.
The software tracks the status of a document with a status property. When you create a document, the default status property is set to Available. If you want to work with a document for an extended time, you can use Property Manager to change the status to In Work. The software then stores your user name with the document. If you want to review information in a document, you can change the status to In Review.
When a document's status is set to In Work, the document cannot be opened for edit by another user. However, a read-only copy of the document is available for review. Anyone attempting to access the document can choose to be notified when the document becomes available. When you have completed work on a document, you can make it available to other users by using the Property Manager to change the document status to Available.
Note:
Document status available to document in Insight XT are: Working, In Review, In Approval, Released, and Obsolete.
You can save a bitmap picture of a document's graphic content and save it as a property. The bitmap picture can be used in the Open dialog box and in Windows Windows Explorer to display a preview of the document.
You can also create a custom large icon to easily view the contents of the document. The custom large icon is displayed in the Solid Edge Find Files window when you select the Large Icon View option in Solid Edge Find Files.
You can define custom properties to store information regarding your documents. The custom property information is stored within the document and viewable on the Custom tab of the Properties dialog box. For example, Density and Accuracy are custom properties.
In Insight XT, custom properties store status information. Custom properties created as a result of saving or opening a Insight XT managed document are:
PDM_Status_ID
Contains the value associated with the status.
PDM_Status
Displays the current status of the document (Working, In Review). This property is owned by Insight XT (/master=iman).
PDM _Status_User
Displays the user of the document. This property is owned by Insight XT (/master=iman).
PDM _Status_Date
Displays the date the document is accessed.
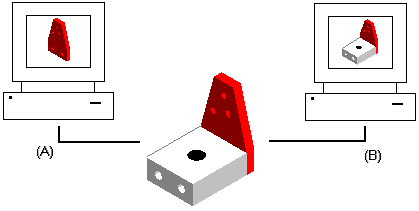
Concurrent design allows multiple users to access an assembly document simultaneously. To assist in controlling concurrent access, you can define the status of parts and assemblies with the Properties dialog box. You can provide read-only access to the top-level assembly and write-access to the parts and sub-assemblies. This allows multiple users to actually work in the context of the same assembly at the same time, but on different parts.

Another advantage of concurrent design is the ability to update the display to see the changes made to the assembly by other users. In the following example, user A can open a part in an assembly. At the same time, user B can display a read-only version of the entire assembly.
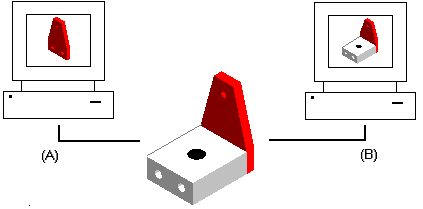
As user A places two additional holes in the part, user B can update the display of the assembly to view any changes made to the assembly.
You can use the Property Manager command to baseline a document, freezing it and preventing further modification. Documents linked to a baselined document are not frozen. You must either baseline or release any linked documents that you want to freeze from modifications.
The baselined document can then be used as a point of reference if changes are made downstream. Baselining a document also forces later modifications to be made in a new version of the document, instead of the current version.
When you baseline a base document, the individual documents are not automatically set to baselined. You have to manually set the documents that you want to baseline. You can also set the status of the individual documents to released.
Base documents contain all the links for individual documents. Individual documents can contain parts, floorplans, drawings, and so forth. You can use the Property Manager command to release a base document and its individual documents at the same time, or you can release individual documents.
Routing slips can be used to send documents to one or more users for review. A routing slip allows you to list the users that should receive mail containing the attached document. Documents can be routed to (A) all users at one time or (B) users one after another.
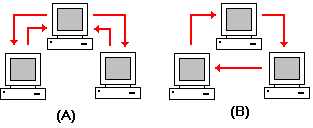
When you route a document to users one after another, and one user completes a review, the document is routed to the next user in the list. When you receive routed documents, you can double-click the attached document in the mail message to activate the appropriate application for viewing the document.
The routing slip can contain a sign-off request for approval or rejection of the contents. The software records all sign-off results. When all the users in the list have approved the document, you can use the Properties command to change the document status to released to freeze the document and prevent further modification.
Note:
Routing is disabled for managed documents.
You can use the Property Manager command to modify existing properties or create new properties for a document in Solid Edge or Insight Connect. The command displays the Property Manager Select dialog box that allows you to select folders and files that contain properties that you want to edit. The dialog box reacts differently depending on whether or not you have an active document.
If you have an active document in Solid Edge, the Property Manager Select dialog box is not displayed. The Property Manager dialog box is displayed to allow you to edit the properties of the active document. You can use the No Levels and BOM View options on the Property Manager dialog box to display the document in a list view with no levels or a BOM view with levels. By default, the view is a list view.
If you have an active document in Insight Connect, the Property Manager Select dialog box is displayed with both the BOM View For and User View options enabled. This allows you to edit the properties based on the BOM structure of the active document or based on a selected list of folders and documents.
If you have no documents open in Solid Edge or Insight Connect, the Property Manager Select dialog box is displayed with User View option disabled and the BOM View For option enabled. You can click the folders and files that contain properties you want to edit and click the Add button to add them to the Edit Properties box. You can select the OK button to display the Property Manager dialog box and edit the properties for selected documents.
Once you make selections on the Property Manager Select dialog box and click the OK button, the Property Manager dialog box is displayed to allow you to edit property values. Any properties that you cannot edit are disabled and appear in gray.
To edit a value, click on the appropriate property cell and type in the new value. When you edit a property, the document containing the property is checked out to prevent others from making changes. After you edit a property value, the property cell is underlined to indicate that it has been changed. The cell remains underlined until you click the Save button to save the changes or click the Restore button to set the value back to the previous value. You can use the Copy, Cut, and Paste buttons to edit information between cells.
Note:
The Save button is disabled when you use the Property Manager command within Solid Edge. To save your changes, use the Save command on the File menu to maintain assembly integrity.
You can use the Show Properties dialog box to specify the properties you want to display on the Property Manager dialog box. To display the dialog box, in the list of displayed documents and folders in the Property Manager dialog box, click the right mouse button on any row containing information, and then click Show Properties on the shortcut menu.
You can add properties to the list that is displayed on the Property Manager dialog box. To add a property to the displayed list, on the Show Properties dialog box, select the property in the Available Properties box and click the Add button to add the property to the Show These Properties in This Order Box. You can use the Select Available Properties From pulldown menu to control the list of available properties.
You can remove properties from the list that is displayed on the Property Manager dialog box. To remove a property from the displayed list, on the Show Properties dialog box, select the property in the Show These Properties in This Order box, and click the Remove button.
You can use the Move Up and Move Down buttons to change the display order for the properties. Use the Move Up button to move the property further to the left in the list and the Move Down button to move the property further to the right.
Note:
You can select a column heading in the Property Manager dialog box, then use drag and drop to change the order of the columns.
To create new document properties, click the New button to display the New Property dialog box. After you add the information for the new property and click the OK button, the property appears in the Show These Properties in This Order box. When you click the OK button on the Show Properties dialog box, the new property is displayed in the list.
You can use the Files of Type option to control the types of documents that appear in the list of documents. You can edit the properties for non-Solid Edge documents. However, for non-Solid Edge documents, you can only edit profile properties for managed documents.
Note:
The Files of Type option is disabled in the BOM view.
You can edit the properties for both managed and non-managed documents. However, you cannot edit both types at the same time. You determine the type of documents you want to edit when you select the first folder or document on the Property Manager Select dialog box. You must be able to check out a managed document to edit the document properties. If you edit a property for a managed document that is not checked out, the document is checked out when you make the change, but the cache is not updated with linked documents. You can change the document profile for a managed document if you have the Profile property displayed on the Property Manager dialog box.
If a property for a managed document belongs to the workspace, but does not belong to a profile, then the property is assigned a String data type. For example, suppose a property, Color, belongs to a workspace named //servername/workspace. The workspace contains a profile, SampleProfile, that does not contain the property Color. Therefore none of the documents associated with SampleProfile contain the property. If you use the Property Manager command and select a managed document that is associated with SampleProfile, the data type of the selected property for the document is String or Text. If you edit the property, the Color property is added to the document with a data type or Text.
You can copy and paste SharePoint property values between parts. You should understand that the copy and paste procedure uses the what you see is what you get method. For example, suppose you have a SharePoint property that is defined to display three decimal places. Part A in Assembly 1 has a value of 5.12493 for a numeric property. If you open the assembly in Property Manager, the property for Part A displays 5.125. If you copy and paste this numeric value into Part B of Assembly 1, the defined property value is the displayed value of 5.125 instead of the actual value of 5.12493.
The display of property values in the list depends on whether or not the property belongs to the profile. If the property belongs to the profile, the list displays the property value for managed document. If the property does not belong to the profile, the property is either a standard or custom property for the document and the list displays the displays the property value from the unmanaged document.
For example, suppose you use the Property Manager command to change the value of a profile property named Width from 20 to 25. Then, you save the document, but do not close it in Solid Edge. If you re-run the Property Manager command, the value displayed in the list is still 20. Since you have not checked in the document that contains the changes to the Width property, the value for the property in the library is still 20.
Each time you upload documents to a workspace or use the Create Unmanaged Copy command to create an unmanaged copy of a document, Solid Edge synchronizes the profile and document properties. Solid Edge creates custom properties in the document for the profile properties that don't exist in the document and then populates the custom property with the profile property value.
Only properties for documents that support standard property storage are synchronized. If the document does not support standard property storage, it is skipped and no error is reported.
When uploading a file, if the profile and document contain different values for the same property, the document property becomes the default value.
When using the Create Unmanaged Copy command, if a custom property already exists, Solid Edge checks to make sure the values for the profile property and custom property match. If the values are different, profile property becomes the default value.
When downloading a file or using the Create Unmanaged Copy command, if there is a custom property that matches a Solid Edge system property, such as document number, Solid Edge copies the value of the custom property to the system property, and then removes the custom property. This only applies to Solid Edge documents. If there is a Solid Edge system property defined as a custom property in a non-native document, the property is not removed from the non-native document.
The Property Manager command, Edit Profile command, Create Unmanaged Copy command, Add Library command, report generation, and advanced search results support the lookup table, currency, and calculated properties delivered with SharePoint 2003.
When working with lookup properties, administrators can specify a SharePoint list and a specific property used to generate the lookup list. Insight uses the list of values to create a list from which you can choose.
If you modify a lookup property with the Solid Edge Custom Property tab and enter a value that is not valid according to the lookup, Property Manager or Edit Profile displays the last valid value for the property that is stored by SharePoint. For example, you can define a lookup property named supplier with three values: SupplierA, SupplierB, and SupplierC. Suppose you create a new file and check the file in, selecting SupplierA for the supplier on the Edit Profile dialog box. You then re-open the part and, on the Custom tab of the Properties dialog box, change the value for supplier to SupplierD. When you attempt to close and save the file, Edit Profile displays SupplierA as the supplier, since SupplierD is not a valid value.
Solid Edge supports all of the currencies and countries supported by SharePoint 2003. Currency properties are stored as numeric custom properties on the Custom Properties tab of the Properties dialog box.
Calculated properties are added as custom properties during property synchronization with the appropriate data type, such as numeric, string, or date, based on the SharePoint data type used to display the calculation. If you manually edit a custom property that is synchronized with a calculated property, your edits are overwritten with the value from the document library.
Note:
Calculated property values are not updated until the document is checked back into the workspace, even if the properties changed during a Solid Edge session.
Solid Edge allows you to format information for the minimum/maximum value, number of decimal places, and show as percentage properties.
The minimum and maximum values for numeric properties are displayed as part of the tool tip in error messages. For example, the text in the error message for a value that exceeded the maximum value displays The value <value entered> is above the maximum value of <property maximum value> for <property name>. Edit the property and enter a valid value.
You can set the number of places for decimal properties to display between 0 and 5 decimal places. Property values of 0 - 4 are rounded down to the nearest decimal place and values of 5 - 9 are rounded up to the nearest decimal value. For example, if decimal places is set to 3 for .1234, the value is displayed as .123.
The value you enter for a Show as Percentage property is multiplied by 100 when it is displayed. When you enter a value, it is divided by 100 when is stored in the document.