You can use the snap-to-keypoint shortcut keys to select and apply the coordinates of a center point, midpoint, endpoint, or intersection point to a command in progress.
You can use the shortcut keys when creating 2D drawing or sketch elements, dimensioning the distance or angle between elements, adding many types of annotations, defining patterns, creating extruded features, and moving selected model faces. You also can use the shortcut keys with commands that manipulate 2D elements, such as move, rotate, mirror, scale, connect, and stretch.
Note:
To turn on the M, C, and E shortcut keys while creating extruded features or moving model faces, press the K key.
Start the command you want to use.
For example, to draw a line that snaps to another element, choose Line  .
.
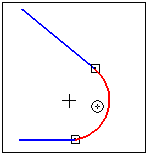
At the prompt to click a point, in the graphics window locate the arc, circle, or ellipse element you want to snap to.
On the keyboard, press C to select the center point of the located element and apply its coordinates to the current command.
Start the command you want to use.
For example, to draw a line that snaps to another element, choose Line .
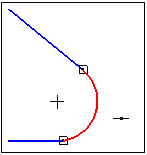
At the prompt to click a point, in the graphics window locate the element you want to snap to.
On the keyboard, press M to select the midpoint and apply its coordinates to the current command.
Start the command you want to use.
For example, to draw a line that snaps to another element, choose Line .
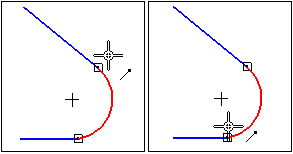
At the prompt to click a point, in the graphics window locate the end of the line element that you want to snap to.
On the keyboard, press E to select the endpoint and apply its coordinates to the command. The cursor location determines which endpoint is selected.
Start the command you want to use.
For example, to draw a line that snaps to an intersection point, choose Line .
At the prompt to click a point, use the cursor to briefly touch each element for which you want to find the intersection point.
Pause the cursor on the last element, so that it remains highlighted.
On the keyboard, press I.
Do one of the following:
If there is only one eligible intersection point, then the point coordinates are applied automatically to the command in progress.
If there are multiple eligible intersection points, select the one you want to snap to Element and object selection.
Example:
Example—Touch each of three lines with the cursor, moving from left to right. Pause with the right-most line highlighted, and then press I. QuickPick opens automatically. The most recently located intersection point is listed first, and the intersection point for the first two lines you touched is listed second.
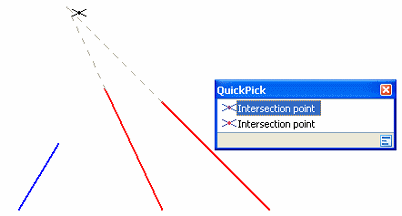
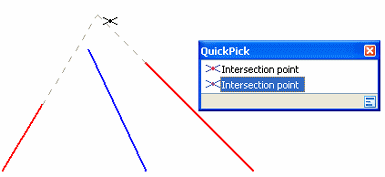
In the QuickPick list, click to select the intersection point you want.
Tip:
The shortcut keys are not case sensitive.
If you cannot snap to a point when you press the appropriate shortcut key, choose IntelliSketch, and then verify that the point type has not been deselected on the Relationships page of the IntelliSketch dialog box.