Steps
Options
Displays the Chamfer Options dialog box.
Select Face
Defines the face from which the setback is measured.
Select Edge
Defines the edges you want to chamfer.
Preview/Finish/Cancel
This button changes function as you move through the feature construction process. The Preview button shows what the constructed feature will look like, based on the input provided in the other steps. The Finish button constructs the feature. After previewing or finishing the feature, you can edit it by re-selecting the appropriate step on the command bar. The Cancel button discards all input and exits the command.
Command Bar Options
Name
Displays the feature name. Feature names are assigned automatically. You can edit the name by typing a new name in the box on the command bar or by selecting the feature and using the Rename command on the shortcut menu.
Select Face Step Options
Select
Sets the face selection method for defining the chamfer feature.
Face—Selects an individual face.
Chain—Selects a tangentially continuous chain of faces.
Accept (check mark)
Accepts the selection.
Deselect (x)
Clears the selection.
Select Edge Step Options
Select
Sets the edge selection method.
Edge/Corner—Selects individual edges, or to select all edges adjacent to a corner by selecting the corner.
Chain—Selects tangentially continuous chains of edges.
Face—Selects all the edges of a face by selecting the face.
Loop—Selects all the edges of individual loops of a face by selecting the face and then choosing a loop.
Accept (check mark)
Accepts the selection.
Deselect (x)
Clears the selection.
Setback
For chamfers created with the the Angle and Setback option, sets the linear distance from the part face to the edge of the chamfer.
Angle
For chamfers created with the Angle and Setback option, sets the angle between the part face and the face of the chamfer.
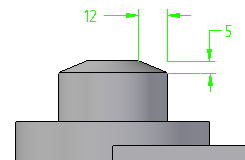
Setbacks
For chamfers created with the 2 Setbacks option, the value you type in the Setback 1 box is applied to the face you select, and the value you type in the Setback 2 box is applied to the adjacent face. As in the earlier example, if you select the cylindrical face and the circular edge at the top of the part, and then specified a Setback 1 value of 5 millimeters, and a Setback 2 value of 12 millimeters, the 5 millimeter value is applied along the cylindrical face, and the 12 millimeter value is applied along the planar face on the top of the part.